- JEDI
- JEDI Demonstration (old version)
JEDI Demonstration (old version)
In this applet, we provide :
- An interaction ontology containing 8 different interactions (their description is provided as tooltips in the applet).
- A set of four empty agent families named 'Blue', 'Red', 'Green' and 'Yellow' where :
- Agents interact only with agents they can see.
- Agents see other agents in a Moore Neighborhood of depth 4 (a 9 x 9 square centered on the agent).
- All agent families are able to particpate in any interaction.
The user may define freely the behavior of agents by dropping interactions into the interaction matrix.
Applet
To use this applet, your screen resolution has to be higher than 750 x 500.

|
If your web browser has problems with applet, try to :
Or :
|
Tutorial to use the applet
To test this applet, you can :
First Step
- Clean the behavior of agents (button 'Clean' in tab 'Configuration').
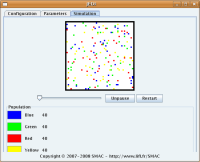
- Go to the 'Simulation' tab and click on 'Unpause' to continue the current simulation, or on 'Restart' to restart the simulation.
No behavior were given to agents, so the simulation does nothing.
Second Step
- Go back to the 'Configuration' tab.
- Drag 'Wander' from the left column and drop it in the interaction matrix, in the cell at the intersection of the line of 'Red' and the column of 'Environment'.
- Go back to the 'Simulation' tab and restart the simulation.
As you can see, now red agents are able to move.
A line of the interaction matrix corresponds to all interactions the agent is able to perform.
Third Step
- Go back to the 'Configuration' tab.
- Drag 'KillTarget' from the left column and drop it in the interaction matrix, in the cell at the intersection of the line of 'Red' and the column of 'Blue'.
- Select this cell, right click, and then left click on the 'Edit' menu.
- Fill the 'limit distance' field with the value '1'. In this new window, the limit distance corresponds to the maximal distance separating a 'Red' agent from a 'Blue' agent to trigger a 'KillTarget' interaction.
- Go back to the 'Simulation' tab and restart the simulation.
As you can see, now a 'Red' agent moves in the environment. If it mets a 'Blue' agent, the 'KillTarget' interaction is performed, and the 'Blue' agent is removed from the environment.
Thus, a cell of the interaction matrix describes the interactions a source agent (the agent named on the left side of the line) is able to perform with a target agent (the agent named on the upper side of the column). Please note that the particular column named 'Environment' corresponds to interactions with implicit target (either the agent itself, or only the environment).
Forth Step
- Go back to the 'Configuration' tab.
- Add the 'KillSource' at the intersection of 'Red' agents line and of 'Blue' agents column. Set the limit distance field of this interaction to 1.
- Go back to the 'Simulation' tab and restart the simulation.
Now, when 'Red' and 'Blue' agents are close enough, 'Red' agents either 'Wander', or kill the 'Blue' agent ('KillTarget') or kill themselves ('KillSource').
Fifth Step
- Go back to the 'Configuration' tab.
- Clean the interaction matrix ('Clean' button).
- Add the 'Wander' interaction at the intersection of 'Red' agents line and of 'Environment' column.
- Select it, right click on it, left click on 'Edit' and fill the 'priority' field with the value '0'.
- Add the 'KillTarget' interaction at the intersection of 'Red' agents line and of 'Blue' agents column.
- Select it, right click on it, left click on 'Edit' and fill the 'priority' field with the value '1', and the 'limit distance' field with the value '1'.
- Add the 'KillSource' interaction at the intersection of 'Red' agents line and of 'Blue' agents column.
- Select it, right click on it, left click on 'Edit' and fill the 'priority' field with the value '2', and the 'limit distance' field with the value '1'.
- Go back to the 'Simulation' tab and restart the simulation.
As you can see, no 'Blue' agent is killed, even if we put the 'KillTarget' interaction in the correct column. This comes from the priority of interactions : the agent tries to perform interactions in decreasing order of priority.
Thus, in this example, it fist tries to perform 'KillSource' if it mets a 'Blue' agent at a maximal distance of 1. Then, if it could not perform this interaction, it tries to perform 'KillTarget' if it mets a 'Blue' agent at a maximal distance of 1. Finally, if it could not perform this interaction, it tries to perform 'Wander'.
In this example, whenever a 'Red' agent meet a 'Blue' agent, it kills itself, and then it never performs 'KillTarget'. Nevertheless, if there is no 'Blue' agent next to a 'Red' agent, it cannot perform neither 'KillSource' nor 'KillTarget', and thus it performs 'Wander'.
Sixth Step
- Go back to the 'Configuration' tab.
- Clean the interaction matrix ('Clean' button).
- Click on the 'Random' button, type the number '10' in the text field and then left click on 'Ok'. This fills the interaction matrix at random with interactions and distances.
- Go back to the 'Simulation' tab and restart the simulation.
Try to understand what this simulation does !
To Conclude
The interaction matrix -- a symbolic overview of agents behavior -- is automaticaly transformed into agent procedural behavior. Thus, the IODA methodology can easily design large scale simulations containing many different agent interacting together with many different interactions.
